User Documentation
Overview
Thank you
At first we would like to say thank you for choosing Sangar Slider
WordPress plugin.
This documentation is for
This documentation is made for developers to show how to create custom Sangar Slider Template. If you are NOT a programmer, please read the End-Users Documentation, you don’t need to follow any of the instructions here.
What you can expect from this documentation
In this documentation you will find out the things you need to know about how to create your own custom Sangar Slider template. You will find guidelines to API and step-by-step tutorial.
Tutorial and Example
In this tutorial, we will create our first sangar slider template. Altough this template will be very basic, but it will cover everything you need to know to create your own template.
There is 3 basic concept that you need to know about creating sangar slider template :
1. Create your template folder inside sangar-slider>template‘s folder. You can name it whatever you want. But in this tutorial, lets name it “my-custom-template“.
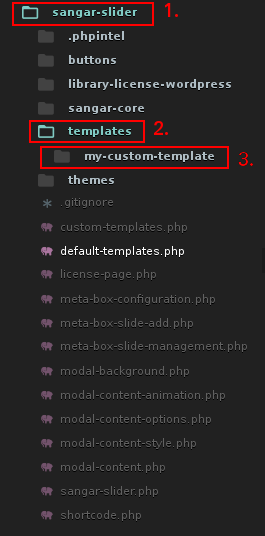
2. Create template.php file inside “my-custom-template” folder. You can name it evertything you want, but again for convention purpose, let’s just name it template.php.
3. Your registered config option inside sangar-slide>custom-templates.php file. We will cover about registering config options in this tutorial.
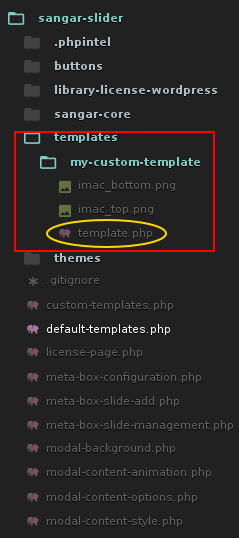
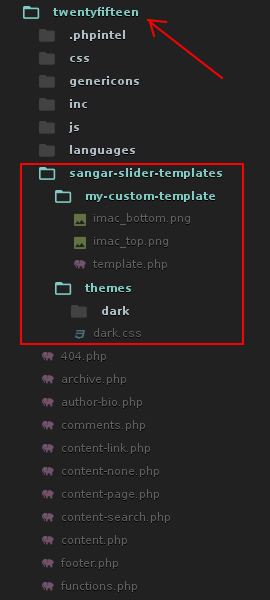
Please take a look this screenshoot for folder and file structure :
Now, let’s create our first template.
A. Registering our template :
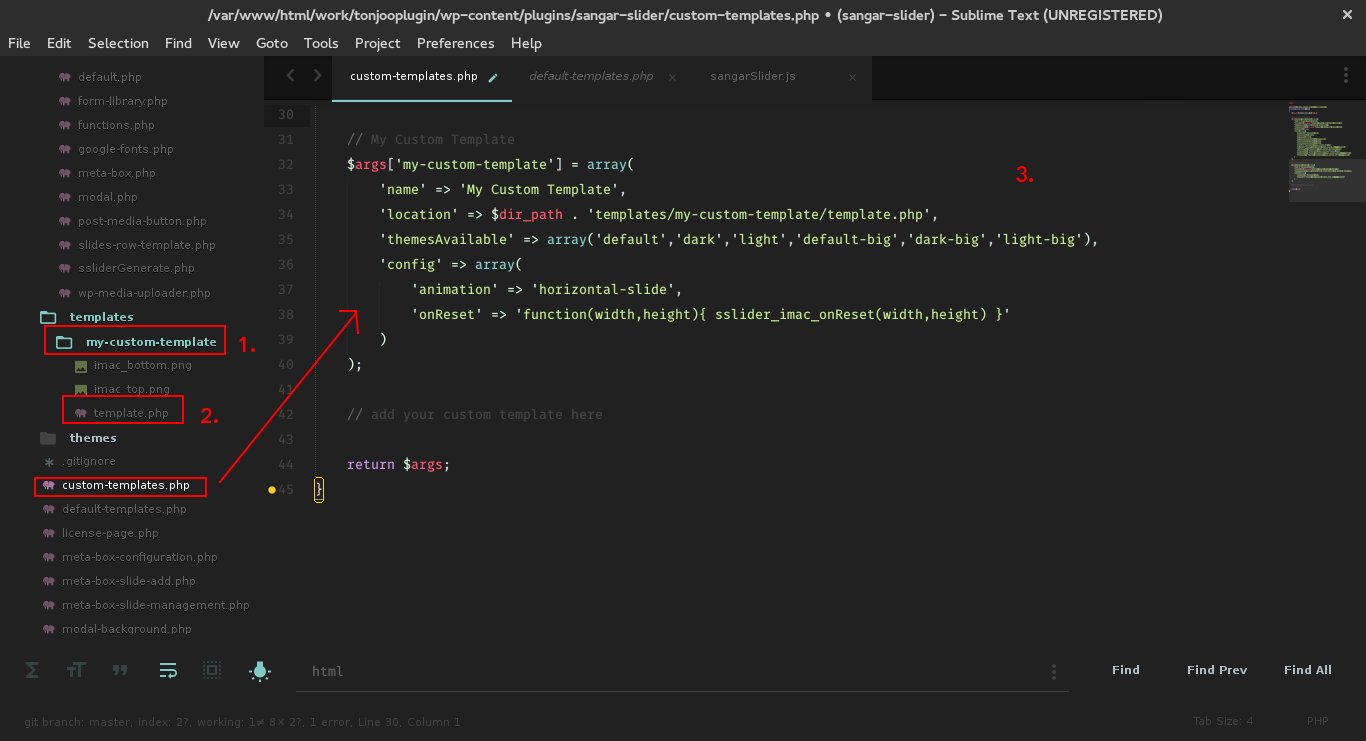
The first thing you need to do, is registering your template. Registering your template is easy, just put your config option code inside the sangar-slider>custom-template.php’s file. You don’t need to create another file, just put your register code in there. You will also find example custom template registered there for your starting point.
And this is our simple registered template :
	// My Custom Template
	$args['my-custom-template'] = array(
		'name' => 'My Custom Template',
		'location' => $dir_path . 'templates/my-custom-template/template.php',
		'themesAvailable' => array('default','dark','light','default-big','dark-big','light-big'),
		'config' => array(
			'animation' => 'horizontal-slide',
			'onReset' => 'function(width,height){ sslider_imac_onReset(width,height) }'
		)
	);
Screenshot :
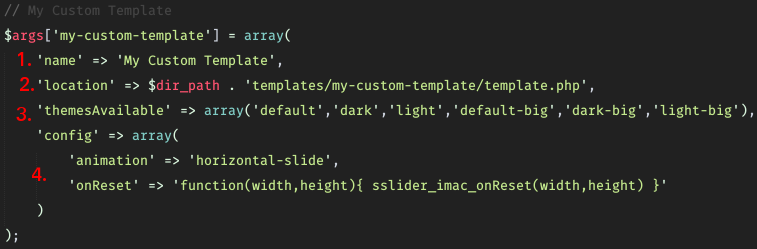
1. Name for our custom template
2. Location of our template.php file. You can put your template.php file anywhere, and even rename it. But for convention purpose, we will use default name and folder structure.
3. What themes do want to include inside your template. Sangar Slider provide several themes for your custom template use.
4. Your config options. This is how your template behave. Sangar Slider providing rich options API (about 42 options in total) to create custom, flexible and robust slider template. Just copy and paste your necessary config option, and see how it works!
You can see our full config options later on this tutorial.
B. Create Template :
1. Create your template folder inside sangar-slider>templates. In this case, we name it my-custom-template.
2. Inside “my-custom-template” folder, create template.php file. In this tutorial, we will create custom iMac Slider template. And this is our code :
<?php
	/**
	 * load ssliderGenerate class
	 */
	$slider = new ssliderGenerate($id,$data,$config,$args);
	$template_dir = plugins_url('/',__FILE__);
?>

<style type="text/css">
	.sslider-imac-top,
	.sslider-imac-bottom {
		margin-left:auto;
		margin-right:auto;
		line-height: 0;
		display: none;
	}

	.sslider-imac-top > img,
	.sslider-imac-bottom > img {
		width: 100%;
		box-shadow: none;
		border: none;
		border-radius: 0;
	}
</style>

<script type="text/javascript">
	function sslider_imac_onReset(width,height) {
		jQuery('.sslider-imac-top').width(width).show();
		jQuery('.sslider-imac-bottom').width(width).show();
	}
</script>

<?php echo $slider->javascript(); ?>

<div class="sslider-imac-top">
	<img src="<?php echo $template_dir ?>imac_top.png">
</div>
<?php echo $slider->html(); ?>
<div class="sslider-imac-bottom">
	<img src="<?php echo $template_dir ?>imac_bottom.png">
</div>
Explanation :
1. Call sangar slider core class :
<?php
	/**
	 * load ssliderGenerate class
	 */
	$slider = new ssliderGenerate($id,$data,$config,$args);
	$template_dir = plugins_url('/',__FILE__);
?>
This is must-have and the most important lines of our code. This line is for calling sangar-slider core class.
2. Styling slider assets :
<style type="text/css">
	.sslider-imac-top,
	.sslider-imac-bottom {
		margin-left:auto;
		margin-right:auto;
		line-height: 0;
		display: none;
	}

	.sslider-imac-top > img,
	.sslider-imac-bottom > img {
		width: 100%;
		box-shadow: none;
		border: none;
		border-radius: 0;
	}
</style>
This is just plain CSS code. Because in this template, we are using 2 assets. Which is imac_bottom.png and imac_top.png, and we need to styling those assets to fit our slider properly.
3. Set and match assets with slider container :
<script type="text/javascript">
	function sslider_imac_onReset(width,height) {
		jQuery('.sslider-imac-top').width(width).show();
		jQuery('.sslider-imac-bottom').width(width).show();
	}
</script>
This is jQuery function for images/assets width. So our assets width (imac_bottom.png & imac_top.png) will fit and match with slider width. Even if we resize our slider, it will keep responsive.
4. Call JS callback config options :
<?php echo $slider->javascript(); ?>
This is the important piece of code. In this code, we are calling our slider options. Before you do that, you need to create your template boostraping first (We already registered our template and setup our options).
5. Show first asset :
<div class="sslider-imac-top">
	<img src="<?php echo $template_dir ?>imac_top.png">
</div>
Here we call our first image assets (imac_top.png), using img src tag.
6. Call slider HTML
<?php echo $slider->html(); ?>
Call slider HTML structure
7. Show second asset :
<div class="sslider-imac-bottom">
	<img src="<?php echo $template_dir ?>imac_bottom.png">
</div>
Here we call our second image assets (imac_bottom.png), using img src tag.
C. JS Config Options :
This is full list of Sangar Slider JS Config Options :
animation : 'horizontal-slide', // horizontal-slide, vertical-slide, fade
animationSpeed : 700, // how fast animtions are
continousSliding : true, // only works for horizontal-slide and vertical-slide
carousel : false, // carousel mode
carouselWidth : 60, // width in percent
carouselOpacity : 0.3, // opacity for non-active slide
timer :  false, // true or false to have the timer
advanceSpeed : 6000, // if timer is enabled, time between transitions
pauseOnHover : true, // if you hover pauses the slider
startClockOnMouseOut : true, // if clock should start on MouseOut
startClockOnMouseOutAfter : 800, // how long after MouseOut should the timer start again
directionalNav : 'autohide', // autohide, show, none
directionalNavShowOpacity : 0.9, // from 0 to 1
directionalNavHideOpacity : 0.1, // from 0 to 1
directionalNavNextClass : 'exNext', // external ( a ) next class
directionalNavPrevClass : 'exPrev', // external ( a ) prev class
pagination : 'bullet', // bullet, content-horizontal, content-vertical, none
paginationBulletNumber : false, // if true, bullet pagination will contain a slide number
paginationContent : ["Lorem Ipsum", "Dolor Sit", "Consectetur", "Do Eiusmod", "Magna Aliqua"], // can be text, image, or something
paginationContentType : 'text', // text, image
paginationContentOpacity : 0.8, // pagination content opacity. working only on horizontal content pagination
paginationContentWidth : 120, // pagination content width in pixel
paginationImageHeight : 90, // pagination image height
paginationImageAttr : ["", "", "", "", ""], // optional attribute for each image pagination
paginationContentFullWidth : false, // scale width to 100% if the container larger than total width
paginationExternalClass : 'exPagination', // if you use your own list (li) for pagination
html5VideoNextOnEnded : false, // force go to next slide if HTML5 video is ended, if false, do looping
textboxOutside : false, // put the textbox to bottom outside
themeClass : 'default', // default theme
width : 850, // slideshow width
height : 500, // slideshow height
fullWidth : false, // slideshow width (and height) will scale to the container size
fullHeight : false, // slideshow height will resize to browser height
minHeight : 300, // slideshow min height
maxHeight : 0, // slideshow max height, set to '0' (zero) to make it unlimited
scaleImage : true, // images will scale to the slider size
background: '#222222', // container background color, leave blank will set to transparent
imageVerticalAlign : 'middle', // top, middle, bottom -- work only while scaleImage
disableLoading : false, // disable loading animation
forceSize: false, // not responsive mode
autoResizeContainer: false, // set the slider containers min-width and min-height
animateContent : false, // animate content after slide
jsOnly : false, // for development testing purpose
onInit : function(){ /* run function on init */ },
onReset : function(width,height){ /* run function on init */ },
beforeLoading : function(){ /* run function before loading */ },
afterLoading : function(){ /* run function after loading */ },
beforeChange : function(activeSlide){ /* run function before slide change */ },
afterChange : function(activeSlide){ /* run function after slide change */ }
You can use this config options inside your template boostrap (See point A), to define slider behavior.
D. See if it works :
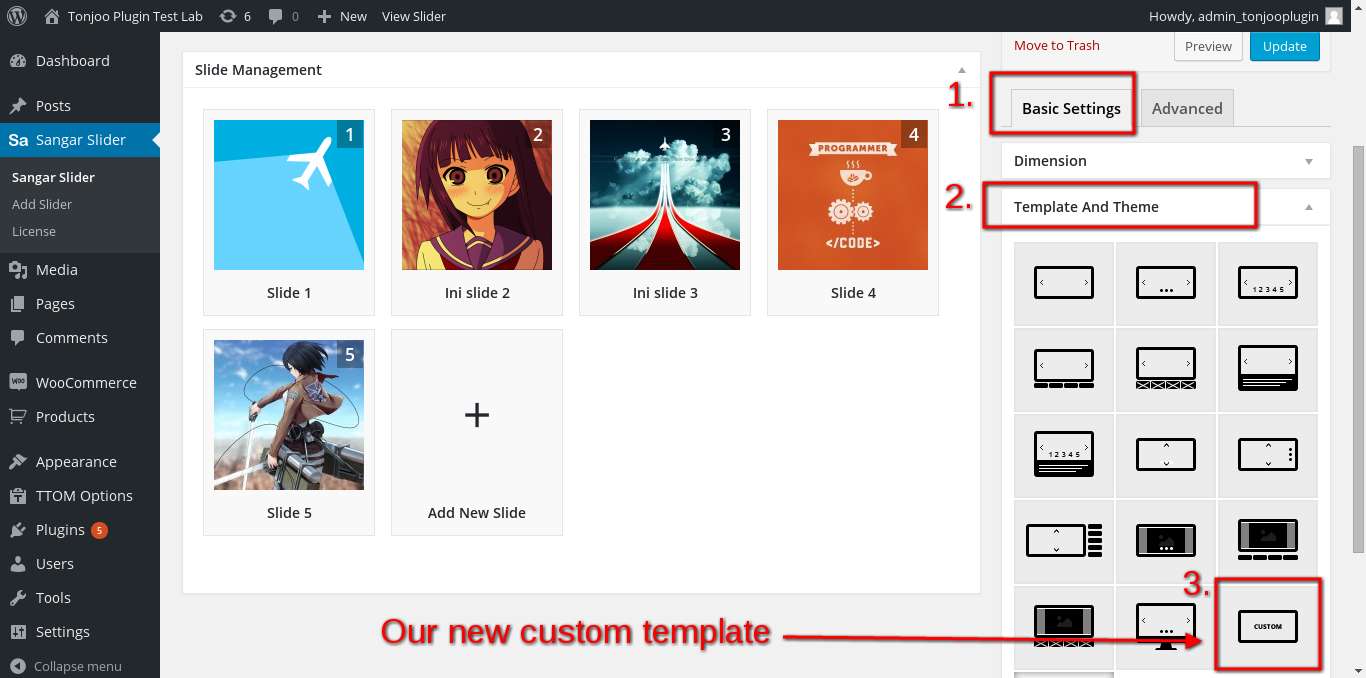
Go to your Dashboard>Sangar Slider>New Slider>Basic Settings>Template And Theme. In here, you will find your newly created template. Screenshot :
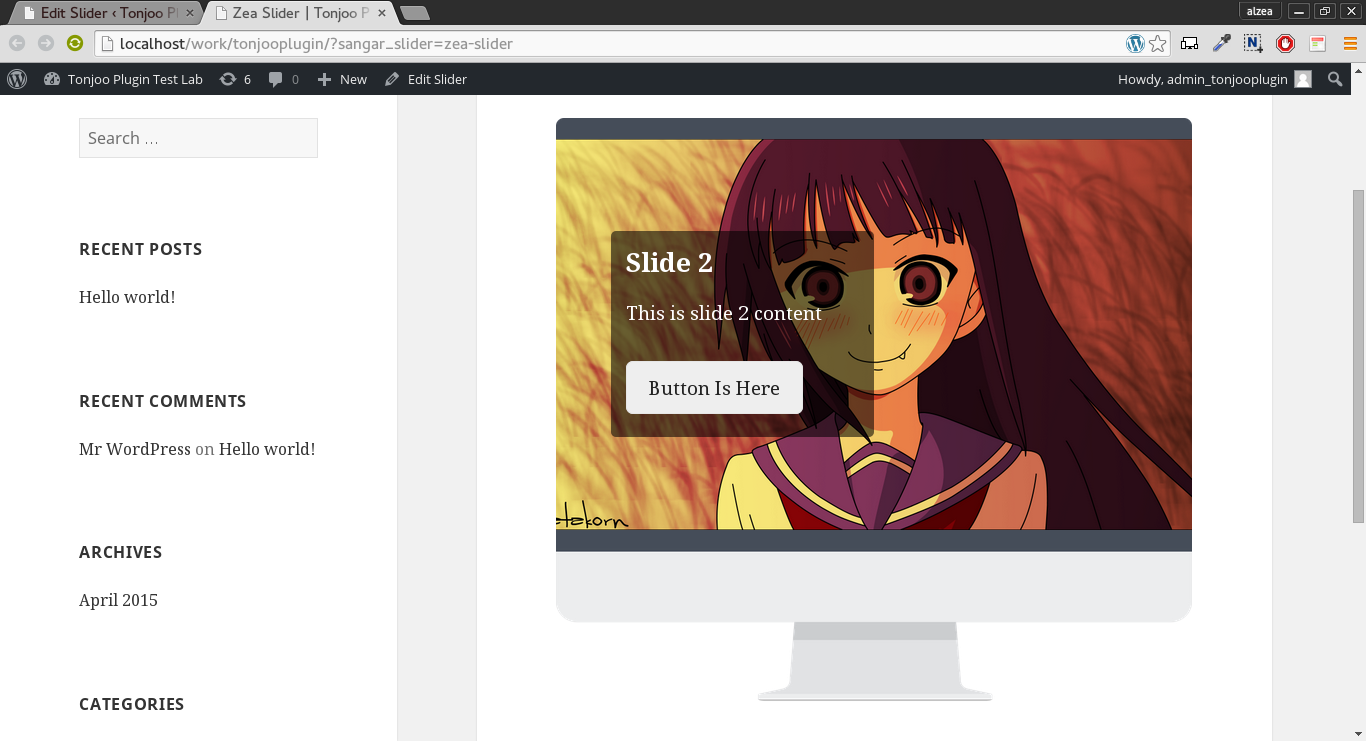
Just click on it, and Update. Open our new Slide, and see our new template :
Integrating Sangar Slider
In this tutorial, we will learn a bit more advance topic about Sangar Slider API. Which is Filter Hooks. With this filter hooks, you can integrating Sangar Slider with almost every WordPress themes/plugins, or even your very own WordPress theme/plugin.
Basic Concept
A Hook is a generic term in WordPress that refers to places where you can add your own code or change what WordPress is doing or outputting by default. Two types of hooks exist in WordPress: actions and filters.
A Filter in WordPress allows you get and modify WordPress data before it is sent to the database or the browser. Some examples of filters would include customizing how excerpts are displayed or adding some custom code to the end of a blog post.
How to Hook into an Filter :
add_filter( $tag, $function_to_add, $priority, $accepted_args );
Sangar Slider Filter Hook
We can easly integrating Sangar Slider with our theme, by registering its filter hooks into our theme’s functions.php, then Sangar Slider will automaticaly detecting our custom template. This is simple example code, to show you how it works :
add_filter('sangar_slider_templates','zea');
function zea($args)
{
	$dir_path = get_template_directory( __FILE__ );

	// IMac Template
	$args['zea-template'] = array(
		'name' => 'zea template',
		'location' => $dir_path . 'sangar-slider-templates/my-custom-template/template.php',
		'themesLocation' => $dir_path . 'sangar-slider-templates/themes',
		'themesAvailable' => array('dark'),
		'config' => array(
			'animation' => 'horizontal-slide',
			'onReset' => 'function(width,height){ sslider_imac_onReset(width,height) }'
		)
	);

	return $args;
}
We will cover these code line-by-line later in this tutorial. For now, lets just make sure we understand that, we can hooks our sangar slider custom template anywhere we want it to be, as long as we define our exact custom template location. So sangar slider can detect and show it properly.
A. Integrating Sangar Slider with your theme
1. Create new folder inside your theme. In this case, we name it “sangar-slider-template” and we are using twentyfiffteen theme.
2. Inside our newly created folder, create two more folders. Let’s called it “my-custom-template” and “themes“. my-custom-template is where we put our custom sangar slider template’s files and assets. Themes is where we put our custom sangar slider theme’s and assets (CSS) files. And this is our folder structure so far :
3. Inside my-custom-template‘s folder, create new file called template.php. Again, you can name it whatever you want, but for convention purpose, lets just name it template.php. And write this code :
<?php
	/**
	 * load ssliderGenerate class
	 */
	$slider = new ssliderGenerate($id,$data,$config,$args);
	$template_dir = plugins_url('/',__FILE__);
?>

<style type="text/css">
	.sslider-imac-top,
	.sslider-imac-bottom {
		margin-left:auto;
		margin-right:auto;
		line-height: 0;
		display: none;
	}

	.sslider-imac-top > img,
	.sslider-imac-bottom > img {
		width: 100%;
		box-shadow: none;
		border: none;
		border-radius: 0;
	}
</style>

<script type="text/javascript">
	function sslider_imac_onReset(width,height) {
		jQuery('.sslider-imac-top').width(width).show();
		jQuery('.sslider-imac-bottom').width(width).show();
	}
</script>

<?php echo $slider->javascript(); ?>

<div class="sslider-imac-top">
	<img src="<?php echo $template_dir ?>imac_top.png">
</div>
<?php echo $slider->html(); ?>
<div class="sslider-imac-bottom">
	<img src="<?php echo $template_dir ?>imac_bottom.png">
</div>
Explanation :
– Call sangar slider core class :
<?php
	/**
	 * load ssliderGenerate class
	 */
	$slider = new ssliderGenerate($id,$data,$config,$args);
	$template_dir = plugins_url('/',__FILE__);
?>
This is must-have and the most important lines of our code. This line is for calling sangar-slider core class.
– Styling slider assets :
<style type="text/css">
	.sslider-imac-top,
	.sslider-imac-bottom {
		margin-left:auto;
		margin-right:auto;
		line-height: 0;
		display: none;
	}

	.sslider-imac-top > img,
	.sslider-imac-bottom > img {
		width: 100%;
		box-shadow: none;
		border: none;
		border-radius: 0;
	}
</style>
This is just plain CSS code. Because in this template, we are using 2 assets. Which is imac_bottom.png and imac_top.png, and we need to styling those assets to fit our slider properly.
– Set and match assets with slider container :
<script type="text/javascript">
	function sslider_imac_onReset(width,height) {
		jQuery('.sslider-imac-top').width(width).show();
		jQuery('.sslider-imac-bottom').width(width).show();
	}
</script>
This is jQuery function for images/assets width. So our assets width (imac_bottom.png & imac_top.png) will fit and match with slider width. Even if we resize our slider, it will keep responsive.
– Call JS callback config options :
<?php echo $slider->javascript(); ?>
This is the important piece of code. In this code, we are calling our slider options. Before we do that, we need to register our options first (We will cover that later on this tutorial).
– Show first asset :
<div class="sslider-imac-top">
	<img src="<?php echo $template_dir ?>imac_top.png">
</div>
Here we call our first image assets (imac_top.png), using img src tag.
– Call slider HTML
<?php echo $slider->html(); ?>
Call slider HTML structure
– Show second asset :
<div class="sslider-imac-bottom">
	<img src="<?php echo $template_dir ?>imac_bottom.png">
</div>
Here we call our second image assets (imac_bottom.png), using img src tag.
B. Registering Sangar Slider Filter Hooks
After we create our template files, now lets register it inside our theme’s functions. So our template will automaticaly detected by our themes after we installing Sangar Slider plugin. This is simple example of Sangar Slider Filter Hooks inside theme’s functions.php :
add_filter('sangar_slider_templates','my_custom_template');
function my_custom_template($args)
{
	$dir_path = get_template_directory( __FILE__ );

	// My Custom Template
	 $args['my-custom-template'] = array(
	      'name' => 'My Custom Template',
 	      'location' => $dir_path . 'sangar-slider-templates/my-custom-template/template.php',
	      'themesLocation' => $dir_path . 'sangar-slider-templates/themes',
	          'config' => array(
	               'animation' => 'horizontal-slide',
	               'onReset' => 'function(width,height){ sslider_imac_onReset(width,height) }'
	   )
	);

	return $args;
}
Line 1 : To create and register sangar slider and your custom filter
Line 2 : Create new function which does something, or in this case to create custom sangar slider template
Line 4 : Define variable of $dir_path with our current theme path. So we can create shortcut to our absolute template path.
Line 7 : Define our custom template arguments (or options) using array approach to creating an action.
Line 8 : Name of our custom template. You can name it anything you want.
Line 9 : Location or absolute path of our custom template file (in this case, template.php). You can put your template files anywhere you want, as long as you call its absoulte path inside your template arguments.
Line 10 : Same as locations. But this is for your custom sangar slider theme location (notice, theme is not template). Theme is your CSS file for template sytling.
Line 11-13 : Your sangar slider config options, how your custom template will behave. You can choose about 49 options to create your very own sangar slider template. Just copy and paste its javascript callback function, and you are ready to go.
Line 17 : Show the $args variable
C. Sangar Slider Javascript Callback Functions
– Basic Concept
We can pass functions around like variables and return them in functions and use them in other functions. JavaScript statements are executed line by line. However, with effects, the next line of code can be run even though the effect is not finished. This can create errors. To prevent this, we can create a callback function.
Example :
$("button").click(function(){
    $("p").hide("slow", function(){
        alert("The paragraph is now hidden");
    });
});
– Sangar Slider JS Callback
Sangar Slider providing robust and rich API to customize our slider to fit our need. Including its javascript callback functions. Using this JS callback API, we can add our unique behaviour on our slider. Let’s say, you want to show some popup alert everytime user click on certain slider, you can do it easly using Sangar Slider JS callback functions API.
This is the list of Sangar Slider JS Callback API :
onInit : function(){ /* run function on init */ },
onReset : function(width,height){ /* run function on init */ },
beforeLoading : function(){ /* run function before loading */ },
afterLoading : function(){ /* run function after loading */ },
beforeChange : function(activeSlide){ /* run function before slide change */ },
afterChange : function(activeSlide){ /* run function after slide change */ }
Example :
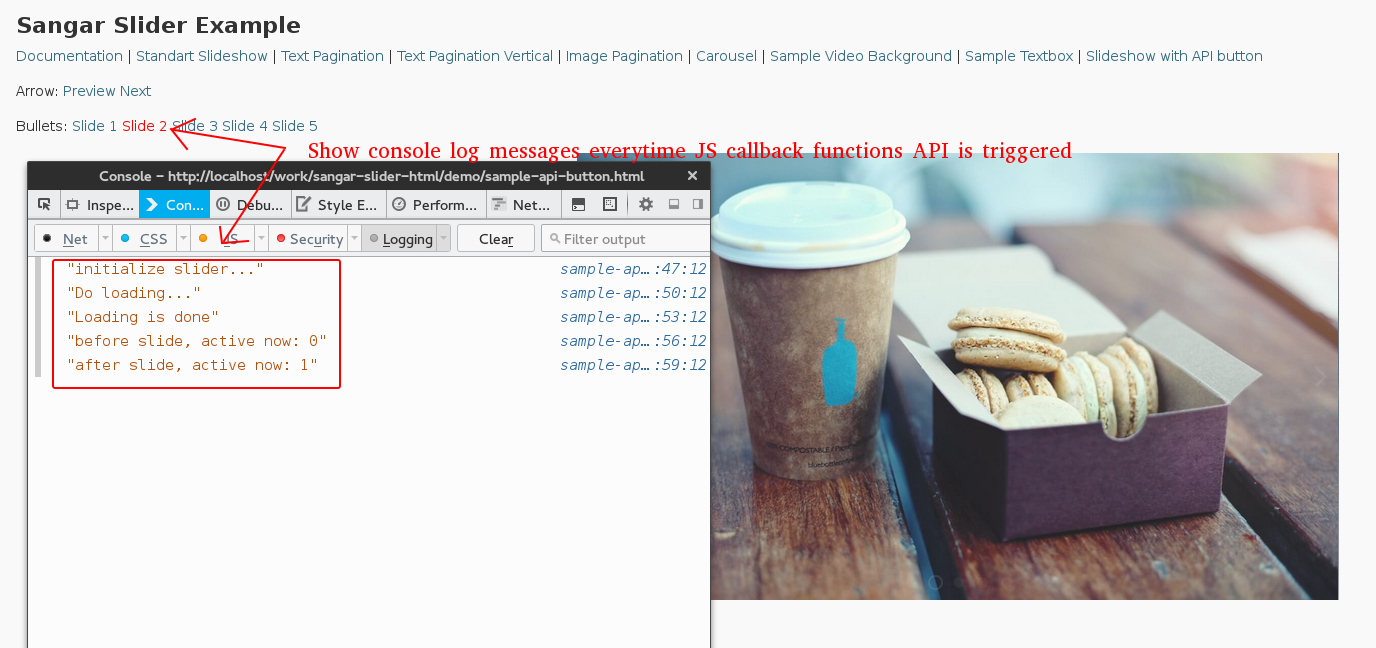
Let’s say, we want to show some log messages everytime we trigger Sangar Slider’s JS callback functions API. So we can use this code :
<script type='text/javascript'>
      var sangar = jQuery(document).ready(function($) {
           /**
           * identifier variable must be unique ID
           */
           var sangar = $('.sangar-example').sangarSlider({
           timer :  false, // true or false to have the timer
           directionalNavShowOpacity : '0.9', // from 0 to 1
           directionalNavHideOpacity : '0.1', // from 0 to 1
           directionalNavNextClass : 'exNext', // external ( a ) next class
           directionalNavPrevClass : 'exPrev', // external ( a ) prev class
           width : 850, // slideshow width
           height : 500, // slideshow height
           minHeight : 300, // slideshow min height
           onInit : function(){
              console.log('initialize slider...');
           },
           beforeLoading : function(){
              console.log('Do loading...');
           },
           afterLoading : function(){
              console.log('Loading is done');
           },
           beforeChange : function(activeSlide){
              console.log('before slide, active now: ' + activeSlide);
           },
           afterChange : function(activeSlide){
              console.log('after slide, active now: ' + activeSlide);
           },
       });
   });
</script>
Explanation :
Line 2-14 : In here, we choose what config options we are going to use by our slider (You can see full list of config options on point C on this tutorial).
Line 15-17 : On this line, we tell the slider to trigger JS callback functions on slider initialization. In this case, we want to show console log message when slider is on init.
Line 18-20 : Now tell the slider to show console log message “Do loading…”, when beforeLoading functions is triggered.
Line 21-23 : After loading is done, tell slider to tigger another JS callback functions, which is show console log message “Loading is done”.
Line 24-29 : When our first slide is show up, sangar slider will trigger another JS callback functions. This time it will show console log message with number of active slider.
Screenshot :
C. Javascript Config Options :
This is full list of Sangar Slider JS Config Options :
animation : 'horizontal-slide', // horizontal-slide, vertical-slide, fade
animationSpeed : 700, // how fast animtions are
continousSliding : true, // only works for horizontal-slide and vertical-slide
carousel : false, // carousel mode
carouselWidth : 60, // width in percent
carouselOpacity : 0.3, // opacity for non-active slide
timer :  false, // true or false to have the timer
advanceSpeed : 6000, // if timer is enabled, time between transitions
pauseOnHover : true, // if you hover pauses the slider
startClockOnMouseOut : true, // if clock should start on MouseOut
startClockOnMouseOutAfter : 800, // how long after MouseOut should the timer start again
directionalNav : 'autohide', // autohide, show, none
directionalNavShowOpacity : 0.9, // from 0 to 1
directionalNavHideOpacity : 0.1, // from 0 to 1
directionalNavNextClass : 'exNext', // external ( a ) next class
directionalNavPrevClass : 'exPrev', // external ( a ) prev class
pagination : 'bullet', // bullet, content-horizontal, content-vertical, none
paginationBulletNumber : false, // if true, bullet pagination will contain a slide number
paginationContent : ["Lorem Ipsum", "Dolor Sit", "Consectetur", "Do Eiusmod", "Magna Aliqua"], // can be text, image, or something
paginationContentType : 'text', // text, image
paginationContentOpacity : 0.8, // pagination content opacity. working only on horizontal content pagination
paginationContentWidth : 120, // pagination content width in pixel
paginationImageHeight : 90, // pagination image height
paginationImageAttr : ["", "", "", "", ""], // optional attribute for each image pagination
paginationContentFullWidth : false, // scale width to 100% if the container larger than total width
paginationExternalClass : 'exPagination', // if you use your own list (li) for pagination
html5VideoNextOnEnded : false, // force go to next slide if HTML5 video is ended, if false, do looping
textboxOutside : false, // put the textbox to bottom outside
themeClass : 'default', // default theme
width : 850, // slideshow width
height : 500, // slideshow height
fullWidth : false, // slideshow width (and height) will scale to the container size
fullHeight : false, // slideshow height will resize to browser height
minHeight : 300, // slideshow min height
maxHeight : 0, // slideshow max height, set to '0' (zero) to make it unlimited
scaleImage : true, // images will scale to the slider size
background: '#222222', // container background color, leave blank will set to transparent
imageVerticalAlign : 'middle', // top, middle, bottom -- work only while scaleImage
disableLoading : false, // disable loading animation
forceSize: false, // not responsive mode
autoResizeContainer: false, // set the slider containers min-width and min-height
animateContent : false, // animate content after slide
jsOnly : false, // for development testing purpose
onInit : function(){ /* run function on init */ },
onReset : function(width,height){ /* run function on init */ },
beforeLoading : function(){ /* run function before loading */ },
afterLoading : function(){ /* run function after loading */ },
beforeChange : function(activeSlide){ /* run function before slide change */ },
afterChange : function(activeSlide){ /* run function after slide change */ }
For more detailed information, please see Sangar Slider’s github page : https://github.com/tonjoo/jQuery-Sangar-Slider
D. See if it works :
Go to your Dashboard>Sangar Slider>New Slider>Basic Settings>Template And Theme. In here, you will find your newly created template. Screenshot :
Just click on it, and Update. Open our new Slide, and see our new template :